


⚡ TL;DR
A hat clip light uses the brim as its support. The cap's position, the brim's curve and the direction of the light all affect where the beam lands. A headlamp has its own head-worn support. Before choosing either arrangement, consider the nearby task you need to see and whether you can reach the light's controls without disturbing its position.
Our Oclip lights provide several ways to carry illumination, including clips and magnetic attachment. Their controls and light sources differ by model. Preparing a brim-mounted arrangement involves both the physical attachment and the operating state you will use. A securely positioned light can still be in the wrong mode for reading a label or sorting small items.
📋 Table of Contents
- 1. Start a Hat Clip Light Setup With the Brim
- 2. Will a 14 mm Clip Fit Every Hat Brim?
- 3. Does a Hat Clip Light Follow Your Eyes?
- 4. Aim at a Stationary Task Before Beginning Work
- 5. Prepare White Light on the Original Oclip
- 6. Choose Oclip Ultra's White Source Before Setting Brightness
- 7. Check Ultra Memory and Battery Status Before Mounting
- 8. Choose the Light Mode for the Detail You Need to See
- 9. Reassess the Arrangement When You Change Hats
- 10. Compare a Brim Light With a Supported Headband Arrangement
- 11. Assemble the Cap Light and Its Separate Accessories
- 12. Treat Protective Headgear as Its Own Equipment System
- 13. Return a Brim Light to Carrying Condition
- 14. FAQ
Start a Hat Clip Light Setup With the Brim
A brim projects forward from the cap and provides a surface for the clip. Its curve sets the orientation of the area where the light attaches. A cap with a sharply curved front presents a different local surface from a flatter brim, even if both belong to the same general hat style. Examine the actual attachment area before deciding where the lamp should sit.
Set the cap in the position you normally wear before aiming the light. Changing how high the cap sits, tightening its adjustment or pulling the brim lower changes the support beneath the lamp. Establish that position first, then bring the light into the arrangement. Otherwise, a later cap adjustment can move an already aimed beam.
Consider the space beneath the brim as well as the space on top. Your forehead, glasses and the cap's own seams may affect access to a switch or clip. A location that looks convenient while the cap is on a table can become awkward once worn. Keep enough room to operate the controls without pushing the light toward your face.
Will a 14 mm Clip Fit Every Hat Brim?
An opening dimension alone cannot establish fit on every hat. The original Oclip description says its clip can clamp objects up to 14 mm thick. The brim edge, any folded binding and a seam beneath the intended attachment can contribute to the thickness encountered by this particular clip.
Thickness alone leaves other questions to answer. A flexible edge may bend with the light attached, while a smooth curved surface can present a different contact area from a flat section. Look at how the actual clip sits against the actual brim. If it only catches a small edge or requires force to reach the intended position, choose another arrangement.
Our original Oclip description also publishes a 10,000-cycle clip durability claim. A cycle claim describes repeated operation of the mechanism. Grip on a particular hat involves that hat's surface and shape as well. Keep those two properties separate when deciding whether you can rely on the arrangement for the intended activity.
| Part of the brim arrangement | What to observe | Decision it informs |
|---|---|---|
| Edge and binding | Thickness where the clip actually closes | Whether the intended contact is within the named model's stated dimension |
| Curved or flexible area | Local surface direction and visible bending | Whether the support holds a useful lamp orientation |
| Nearby cap details | Seams, adjustment parts and other objects | Whether the clip and controls remain accessible |
| Intended activity | Cap removal, changes of position and nearby people | Whether to keep the light on the cap or use another supported arrangement |
Check access to the clip's release area before you need to remove the light. The brim should allow you to hold the cap and operate the clip without pulling on the light's lens or charging cover. Removing the lamp deliberately is preferable to using the cable, switch or a small accessory as a handle.
Does a Hat Clip Light Follow Your Eyes?
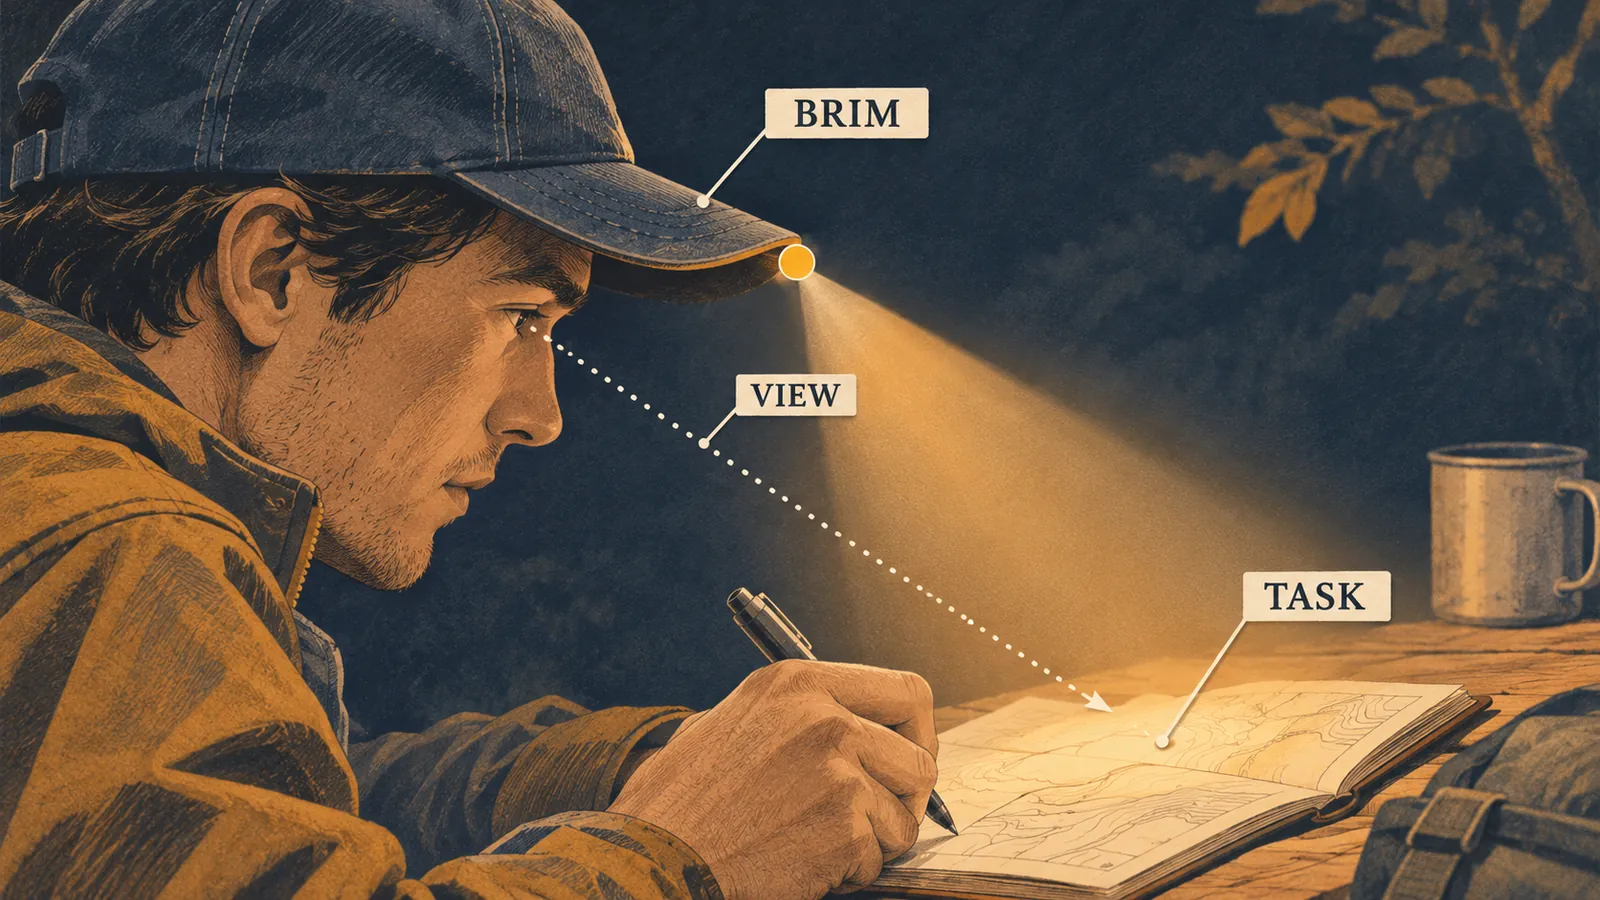
A brim-mounted light follows the cap's movement. Looking elsewhere with your eyes alone leaves the lamp pointed along its existing direction. Turning or lowering your head changes that direction, provided the cap and attachment stay in place. This distinction matters when a small detail sits near the edge of the illuminated area.
This difference becomes apparent with a nearby task. You might look between a label in one hand and a tray below it without moving your head much. The lamp's direction stays tied to the cap during that eye movement. If one surface remains outside the useful illuminated area, move the task, change your head position, or reposition the light as appropriate.
A headlamp also travels with your head, although its support is independent of a cap brim. Its particular mount may provide a documented aiming adjustment. Compare that mechanism with the complete cap-and-clip arrangement you intend to use. A label such as hands-free describes the carrying role without specifying an automatic link between eye movement and beam direction.
The short distance to a label or sorting tray makes changes in position easy to notice. At a different working distance, the relationship between the lamp, your face, and the object changes again. Judge the view at the distance of the actual task. Avoid selecting one permanent brim position solely because it illuminates a wall across the room.
Aim at a Stationary Task Before Beginning Work
Place the cap and light in their intended positions, then look at a simple stationary target such as an instruction sheet on a table. Check whether the necessary text or working area is illuminated. This gives you a defined object to use while arranging the light, without involving moving tools or relying on a distant point that is unrelated to the job.
Check the view from your working posture. Reading a sheet while standing and looking at the same sheet after sitting can change where you hold your head. If you are preparing a few items in a shallow tray, include the tray's far edge in the check. You may need to move the work closer or adjust the attachment location to obtain a useful view.
Keep your hands in their expected positions during that check. A hand holding an item can sit between the light and a smaller detail behind it. Turn the item or change its position to see whether the obstruction clears. The aim is to arrange a workable view for the ordinary task, with the required controls still within reach.
If the arrangement needs repeated cap movement to find the same area, consider a different support. A light placed beside the task can remain with that surface while you look away. A suitable headlamp can provide a different head-worn mounting system. Our headlamp guide provides model choices once that carrying decision is clear.
Prepare White Light on the Original Oclip
The original Oclip combines white and red light in a compact body. Its normal aluminum version is listed at 30 g including the battery. The copper version has a different published weight, so keep the material and exact configuration in a comparison. A weight figure for one version should stay attached to that version.
With the original Oclip unlocked and operating in white-light mode, holding the button changes brightness through Low, Medium, and High. Release the button at the level you need. Moonlight sits outside that cycle. This gives you a specific way to select working brightness while the light is still in your hand and the button is easy to see.
For Moonlight, the instructions describe holding the button for at least one second while the flashlight is off. Use that procedure with the light unlocked. Prepare and inspect the resulting output before placing the lamp near your face or attaching it to the brim. You can then judge whether that level shows the stationary task clearly.
The light remembers its current mode when turned off, with Strobe and White Light Beacon excluded from memory. A later switch-on can therefore depend on the mode left by the previous user. For a shared light, check the actual output during preparation instead of assuming that a single press will always start the same white setting.
Original Oclip's red entry is a double press while the light is on or off, with the switch unlocked. Its instructions also describe double pressing while on to switch between red and white. A double press thus has a different purpose from holding the button to select ordinary white brightness. Learn that distinction before trying to find a setting by feel on a worn cap.
Choose Oclip Ultra's White Source Before Setting Brightness
Oclip Ultra provides white floodlight, white spotlight and UV, selected by rotating its side selector. For a nearby instruction sheet or sorting tray, choose one of the white sources first. You can then adjust brightness within that source while checking the entire area you need to see.
The Ultra manual lists separate white-light specifications. At Low, floodlight is 10 lumens and spotlight is 9 lumens, each with a published 27-hour runtime. At Medium, floodlight is 100 lumens and spotlight is 90 lumens, each listed for 3 hours 30 minutes. Keep the source name with the level when comparing these entries.
For a broad tray, look at whether the needed items remain visible together. For one small label, check the detail and the surrounding reflections. These ordinary preparation checks help you choose between the available sources without treating a lumen number as a description of the beam's shape on your particular work surface.
Source selection and brightness selection use different controls. With the light unlocked and white illumination on, holding the button cycles Low, Medium and High. Release at the level you need. Prepare that setting with the lamp in hand, then attach it and recheck the task from your normal posture.
Keep the selector's markings visible during preparation. UV is a separate source with its own operating instructions, and the manual warns against shining the light into eyes. Turn the light away from faces while inspecting the selector. A remembered white brightness does not replace checking which source is selected.
Check Ultra Memory and Battery Status Before Mounting
Ultra's single press turns an unlocked light on or off. Its white-light memory includes Moonlight, Low, Medium and High. Turbo is remembered as High, while Strobe and White Light Beacon are excluded from memory. A previous user's last operation can therefore affect the level recalled when you prepare the light for a cap.
Moonlight has a separate entry. With the light unlocked and off, hold the button for at least one second. If Moonlight was the last mode used, a single press can recall it. This lets you deliberately prepare the lowest listed white setting before attaching the light, instead of reaching immediately for a higher-output shortcut.
For a battery check, rotate Ultra's selector while the light is off. Read the resulting indicator before choosing the source for your task. The manual also describes a brief red indication when the light is locked. That lockout signal and a battery-status indication have different meanings, so identify the operating state before deciding that charging is necessary.
Ultra's lockout procedure starts with the light off and a button hold of about two seconds. To unlock, hold again until the light turns on. Carrying lockout and working brightness are separate preparations. Unlock and inspect the output away from your face before clipping the light into its working position.
The Ultra's listed 55 g weight includes its battery. Consider that alongside the actual cap's support and attachment location, without treating the number as a prediction of personal comfort. The original standard aluminum Oclip's 30 g figure applies to another configuration. A change in weight calls for checking the cap arrangement again.
Choose the Light Mode for the Detail You Need to See
White light is the straightforward starting point for checking an instruction sheet or identifying small items whose color matters to the task. Select enough output to make the detail readable at the actual working distance. A brighter setting can change reflections from a glossy label, so check the label in its intended orientation before increasing output again.
For a red-light task, original Oclip has a published steady 4-lumen red mode. Its instructions distinguish constant red illumination from red blinking, selected by a hold while in red mode. Verify the steady state before mounting it. Ultra's white floodlight, white spotlight and UV choices serve different source requirements, so select the model around the light needed for the actual task.
Reassess the Arrangement When You Change Hats
A brim setup belongs to the cap on which it was arranged. Moving the lamp to another baseball cap can change the local angle, thickness, and available space around the clip. A softer, wider brim can present another set of conditions. Start again with the actual attachment area and working view when changing hats.
Check the cap's adjustment after adding the light. If the cap moves when you turn your head during ordinary use, the light's position changes with it. Altering the lamp's mode cannot correct a shifting support. Choose a different support or carrying arrangement if the intended cap will not stay in a useful position for the task.
Also consider other items you plan to wear. Glasses, hearing protection or a jacket hood may occupy space near the brim or controls. Arrange the complete combination before starting the activity. Keep any required protective equipment correctly fitted according to its own instructions.
Compare a Brim Light With a Supported Headband Arrangement
A headband provides a support that can be used without keeping the same cap on. That can matter when moving between an outdoor preparation area and an indoor room where you remove your hat. A brim light suits a workflow that keeps the cap in use, while a separate head-worn support changes that dependency.
For a clip light placed on a headband, use an attachment specified for that exact model. A clip gripping a cap edge and a dedicated strap holding the device can involve different contact areas and orientations. Check the named compatibility and mounting instructions before assuming that a spare strap will accept a light from the same product family. Our headlamp setup checklist separates the components and compatible accessories to check before choosing that arrangement.
Keep the intended duration in the decision. Original Oclip's published Medium entry is 100 lumens for 90 minutes. Ultra's 100-lumen floodlight Medium entry is listed for 3 hours 30 minutes. These are mode-specific references. Choose the line for the planned illumination, and account for whether you want to keep wearing the cap throughout that period.
Assemble the Cap Light and Its Separate Accessories
Ultra's illustrated package contains the light and a USB-C charging cable. Plan the cap and any compatible headband as additional parts of the arrangement you will actually use. A photograph of a light in a different carrying position can show a use without identifying everything included in the selected package.
Ultra's manual lists a 0.25-meter charging cable, a 5 V, 1 A input and a charging time of about 1.5 hours. The short supplied cable affects where you can place the light relative to the power source during preparation. Set up that charging position separately from the cap you intend to wear, with the connector accessible and the light supported.
Ultra's charging instructions state that High and higher output are unavailable during charging. A brightness choice checked while connected therefore does not cover every unplugged mode. Disconnect the cable before preparing the lamp for cap-mounted use, then check the chosen white source and brightness with the light operating from its own battery.
During Ultra charging, the indicator blinks red from 0 to 95 percent and shows green from 95 to 100 percent. Green identifies that published range, so it should not be treated as an exact full-charge reading. Keep charging status separate from the off-state battery check used when preparing the light for work.
Close the USB-C port cover when the port is not in use, as the instructions direct. Also inspect the magnetic clip after workshop storage. The manual warns that adhering metal powder can affect its function and calls for immediate cleaning. Clear that contact area before placing the clip against fabric or a cap's binding.
Treat Protective Headgear as Its Own Equipment System
A protective helmet or hard hat has an equipment role beyond supporting a light. Follow the headgear manufacturer's attachment instructions and workplace requirements when selecting lighting for it. A clip's published opening does not establish that it is an approved accessory for that protective system.
Use the mounting location and accessory arrangement permitted for the headgear in question. Avoid drilling, reshaping the brim or adding an improvised attachment to make a general clip light fit. If the required lighting cannot be arranged within the equipment instructions, select a suitable lighting system with an appropriate mounting solution.
For ordinary household use, keep the scope simpler. A casual cap can support a personally chosen lighting arrangement after you check its actual fit and view. That preparation does not create a protective-headgear approval or a retention rating for moving work.
Return a Brim Light to Carrying Condition
Before removing the cap, switch the light off and support the cap as you operate the clip. Confirm that you are handling the release area rather than pulling on the charging cover. The light can then return to its normal carrying location without leaving the brim to bear the force of an awkward removal.
Follow the model's lockout instructions for transport. Original Oclip and Ultra have their own documented button sequences and indicator behavior. Keep those instructions with the model you use. A clip flashlight that stayed correctly aimed on the cap still needs the appropriate off and carrying state when placed in a bag.
Keep a hot light out of a fabric bag or fusible plastic container, as the manuals direct. This also matters when packing it beside a cap or other clothing after use. Keep the light off and its lens clear while it cools before packing it beside the cap.
FAQ
Changelog
- November 7, 2026: Product information and buying guidance reviewed.




