Olight makes some of the lights discussed here. Olight specs and regular prices come from its product pages and user manuals as of September 2026; other facts are linked to their sources.
⚡ TL;DR
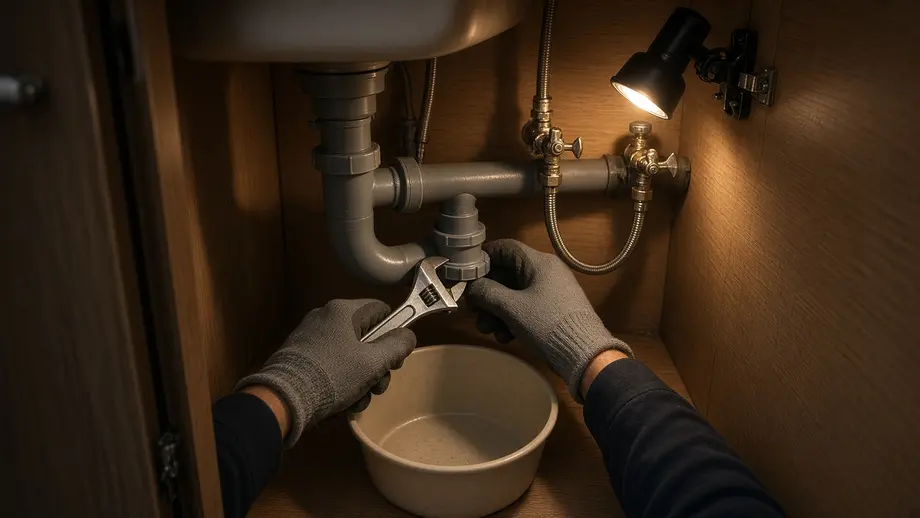
The best under sink lighting for a repair is a small floodlight placed inside the cabinet, 8 to 16 inches from the fitting and aimed from the side, not a light shining in from the doorway. Mount it with a magnet, a clip or a strap, run it on low or medium, and keep it above the drip line.
If you have ever worked on a sink trap with your phone wedged between your chin and shoulder, you know the problem. Your head blocks the cabinet opening, a headlamp lights the back of your own arm, and the one hand that should hold the wrench ends up holding the light. Most under-sink jobs need two hands, so the light has to hold itself.
This table sums up the under sink lighting kit that solves those problems, with the minimum spec worth accepting for each role.
| Role | Recommended type | Key spec floor | Olight example |
|---|---|---|---|
| Main work light inside the cabinet | Clip or magnet floodlight with a tilting head | 100 lm medium mode that runs 3+ hours; clip or magnet mount | Olight Oclip 2 Pro (530 lm floodlight, IP66) |
| Budget main light | Clip light that can also hang or stick to steel | 100 lm for 3+ hours; IPX6 or better | Olight Oclip Pro S (600 lm max, IPX6) |
| Backup light that may get dunked | Small flashlight rated for immersion | IPX8; a low mode for long runtime | Olight Baton 4 (1,300 lm max, IPX8) |
| Mounting point on a wooden cabinet | Adhesive magnetic plate | Steel face for magnets; adhesive backing | Olight L-Stand ($5.99) |
| Light that follows your eyes | Clip light worn on a head strap | A strap listed as compatible; low and medium modes | Olight Oclip Pro S on the Oclip Series Headlamp Strap ($7.99) |
📋 Table of Contents
- 1. Why Doesn't Light From Outside the Cabinet Work?
- 2. How Much Light Do You Need Under a Sink?
- 3. Four Ways to Mount a Light Inside a Sink Cabinet
- 4. Is a Floodlight or Spotlight the Better Tight Space Work Light?
- 5. Where Should Under Sink Lighting Go? A Placement Routine
- 6. Do You Need a Waterproof Light Under a Sink?
- 7. What Should You Do If Your Flashlight Falls Into Water or Grease?
- 8. A Plumber Flashlight Setup That Frees Both Hands
- 9. Is Undercabinet Lighting Worth It?
- 10. What Is the Best Type of Lighting to Put Over a Kitchen Sink?
- 11. What Is the Best Type of Under Counter Lighting?
- 12. Your Under Sink Lighting Checklist
- 13. FAQ
Why Doesn't Light From Outside the Cabinet Work?
Light from outside the cabinet fails for three reasons: distance, angle and blockage. A flashlight at your head sits about 3 feet from the back of the cabinet, so the light that reaches the fitting is roughly 13 times weaker than the same light placed 10 inches away. It also arrives at a shallow angle, and your head, arms and the pipes themselves throw shadows over the spot you need to see.
Distance. Light from a small source spreads out as it travels. HyperPhysics at Georgia State University explains the inverse square law for light: if you know the light reaching a surface at 1 meter, "it will be one fourth as much at 2 meters." Apply that to a sink cabinet. From your head at the cabinet opening to the back wall is about 0.9 m (36 in). A light clipped inside sits about 0.25 m (10 in) from the same spot. The ratio is (0.9 ÷ 0.25)² = 3.6² = 12.96, so the inside light delivers about 13 times more light on the fitting at the same setting. That is why a pocket-size light mounted inside the cabinet beats a big light held at the door, and why most small EDC flashlights have more than enough output for the job once they are placed close.
Angle. Light that skims across a surface spreads over a larger area. The light landing on a surface scales with the cosine of the angle from straight on. If a beam from the doorway meets the cabinet floor 15 degrees above horizontal, that angle from straight on is 75 degrees, and cos 75° = 0.26. The floor receives only about a quarter of the light it would get from a lamp aimed straight down.
Shadows. A low light also stretches shadows. The shadow behind an object is its height divided by the tangent of the light's angle. This table uses a pipe or fitting that stands 2 in (5 cm) above the surface behind it.
| Light angle above the surface | Calculation | Shadow length behind a 2 in (5 cm) object | Share of head-on light |
|---|---|---|---|
| 15° (flashlight held at the cabinet opening) | 5 ÷ tan 15° = 5 ÷ 0.268 | 18.7 cm (7.4 in) | 26% |
| 30° | 5 ÷ tan 30° = 5 ÷ 0.577 | 8.7 cm (3.4 in) | 50% |
| 45° | 5 ÷ tan 45° = 5 ÷ 1.000 | 5.0 cm (2.0 in) | 71% |
| 60° (light clipped high inside the cabinet) | 5 ÷ tan 60° = 5 ÷ 1.732 | 2.9 cm (1.1 in) | 87% |
A 7-inch shadow from a single fitting can hide a slip nut, a compression ring or the drip you are hunting. Raising the light to 45 to 60 degrees cuts that shadow to 1 to 2 inches. This is why placement beats brightness.
How Much Light Do You Need Under a Sink?
You need far less output than most flashlights offer, because the light sits so close. As a rough guide, one flashlight at 12 inches on its low mode can put several hundred lux on the fitting in front of it. OSHA's construction standard sets a 10 foot-candle minimum, about 108 lux, for workrooms. A medium mode near 100 lumens is plenty; turbo mostly adds glare off chrome and white plastic.
OSHA's illumination standard, 29 CFR 1926.56, lists minimum light levels for construction work. It sets 10 foot-candles for "mechanical and electrical equipment rooms" and "indoor toilets and workrooms," and 30 foot-candles for first aid stations and offices. One foot-candle equals 10.764 lux, so those floors are about 108 lux and 323 lux. These are legal minimums for job sites, not targets for fine work, but they show how little light a task needs.
To estimate what a flashlight delivers, divide its peak intensity (candela) by the distance squared. Lux = candela ÷ meters². Olight publishes one peak candela figure per light, so this table makes one stated assumption: intensity scales with lumens across modes of the same beam. The results are center-of-beam values at 0.3 m (about 12 in).
| Light and mode | Candela used | Lux at 12 in (0.3 m) | Foot-candles |
|---|---|---|---|
| Oclip Pro S, Moon 1 lm | 1,600 × 1 ÷ 600 = 2.7 cd | 2.7 ÷ 0.09 = 30 lux | 2.8 fc |
| Oclip Pro S, Low 10 lm | 1,600 × 10 ÷ 600 = 26.7 cd | 296 lux | 27.5 fc |
| Oclip Pro S, Medium 100 lm | 1,600 × 100 ÷ 600 = 266.7 cd | 2,963 lux | 275 fc |
| Baton 4, Moon 0.5 lm | 7,225 × 0.5 ÷ 1,300 = 2.8 cd | 31 lux | 2.9 fc |
| Baton 4, Low 12 lm | 7,225 × 12 ÷ 1,300 = 66.7 cd | 741 lux | 69 fc |
| Baton 4, Med 60 lm | 7,225 × 60 ÷ 1,300 = 333.5 cd | 3,705 lux | 344 fc |
| Oclip 2 Pro spotlight, Low 9 lm | 3,906 × 9 ÷ 400 = 87.9 cd | 976 lux | 91 fc |
| Oclip 2 Pro spotlight, Medium 90 lm | 3,906 × 90 ÷ 400 = 878.9 cd | 9,765 lux | 907 fc |
Two points stand out. First, even the low modes clear OSHA's 10 foot-candle workroom floor at the center of the beam by a wide margin. Second, a narrow spot on medium is far brighter than a close task needs, which is why it can blind you when it bounces off a chrome P-trap. The edges of any beam are dimmer than the center, so a wide flood on low or medium is usually the most comfortable choice.
Good light is also how you find the leak. The EPA's WaterSense program tells homeowners to "examine faucet gaskets and pipe fittings for any water on the outside of the pipe to check for surface leaks," and its Fix a Leak Week page says the average household's leaks can account for more than 9,300 gallons of water wasted every year. A bead of water on a supply line shows up best under light from the side, which makes it glint. Leaks you cannot see, such as a line behind the cabinet back, call for a thermal imager, which reads temperature rather than reflected light.
Four Ways to Mount a Light Inside a Sink Cabinet
The four practical mounts are a magnet, an adhesive steel plate, a clip and a strap, loop or hook. Magnets need steel, and most things under a sink are not steel: copper, PEX, PVC and the wooden cabinet will not hold one. Test before you rely on a surface, and bring an adhesive steel plate or a strap as a backup.
Stainless steel sinks are a common surprise. The Specialty Steel Industry of North America notes in its stainless steel FAQ that "the austenitic or 300 series stainless steels are generally non-magnetic but high levels of cold work can make them somewhat magnetic." The same FAQ lists "deep drawing a sink" as one form of cold work. In practice, a magnet may grab one part of a sink bowl weakly and slide off another. Touch the light's magnet to the spot first, and never trust a weak hold over your face.
This table compares the four mounts for a typical kitchen or bathroom sink cabinet.
| Mount | What it needs | Where it works under a sink | Watch out for |
|---|---|---|---|
| Magnet (tail or clip magnet) | A steel surface | Older cast iron drains, steel brackets, a steel plate you add | Copper, PEX, PVC and wood do not hold; stainless may be weak |
| Adhesive steel plate | A clean, dry flat panel | Cabinet side wall or the underside of the countertop lip | Wipe off grease and moisture first so the adhesive grips |
| Clip | An edge no thicker than the clip opening | Face-frame lip, a shelf edge, a strap or a hose clamp | Measure the edge; many cabinet doors are too thick for small clips |
| Strap, loop or hook | Something to wrap around or hang from | Drain tailpiece, shelf bracket, a cup hook or carabiner on the face frame | Do not hang weight on a plastic compression fitting or a supply line |
The adhesive plate solves the wooden-cabinet problem. The Olight L-Stand ($5.99, regular price, September 2026) is "made of magnetic stainless steel with a powerful adhesive backing." Olight lists it as compatible with the Baton Ultra, Baton 4 Pro, Baton 4 and Baton 3 Pro, plus "other Olight products that have similarly sized magnetic tail caps." Stick it high on the cabinet side wall, about level with the trap, and the light points down into the work at a steep angle. Olight does not describe the adhesive as removable, so treat it as a semi-permanent fixture and pick a spot you are happy to leave it.
A clip works when the edge is thin enough. The Oclip 2 Pro clip "grips objects up to 14 mm thick," according to Olight, which is about 0.55 in. Measure your face frame or shelf edge before you count on it. If nothing fits, a hook-and-loop strap around the drain tailpiece or a shelf bracket gives the clip something to grab. Olight also notes that on the Oclip 2 Pro, "loops, hooks, and carabiners keep your hands free," so a cup hook or small carabiner on the face frame is another hanging point.
Tip: Put the light on the side opposite your working hand. A right-handed person turning a slip nut casts a shadow to the left, so a light on the right, pointing in and down, keeps your own hand out of the beam.
Is a Floodlight or Spotlight the Better Tight Space Work Light?
A floodlight is the better tight space work light. At under 16 inches, you want an even patch of light that covers the trap, the shutoff valves and your hands at once, without a hot spot that glares off chrome. A spotlight is useful only for peering into a drain opening or reading a label on the back wall.
Beam shape comes down to candela per lumen. The more candela a light makes per lumen, the more its output is packed into a narrow center. For a deeper explanation of beam shapes, see our guide to flashlight throw vs flood. Under a sink, the flood side wins almost every time, because nothing in the cabinet is more than an arm's length away.
The Oclip 2 Pro shows the difference inside one light. Olight lists its floodlight at up to 530 lumens and its spotlight at 400 lumens with a 125-meter throw and 3,906 candela. The spotlight's reach is wasted in a cabinet, but it does help when you need to see down a drain line or into the disposer's outlet. For the rest of the job, the flood is the mode to leave on.
A good tight space work light also needs to aim without moving. Olight says the Oclip 2 Pro pairs "a 115° head tilt with 360° clip rotation." That matters under a sink, where the only mounting spot may face the wrong way. You fix the body where it holds, then turn the head toward the work.
Where Should Under Sink Lighting Go? A Placement Routine
Place under sink lighting high, to the side and close: about 8 to 16 inches from the fitting, 45 to 60 degrees above it, on the side opposite your working hand, and outside the path of any drip. Set it once before you start loosening anything. Moving a light mid-job with wet hands is how lights end up in the bucket.
Follow these steps in order.
- Clear the cabinet floor. Cleaners, sponges and rags come out first. InSinkErator's Badger series manual warns: "Do not store flammable items such as rags, paper or aerosol cans near disposer."
- Close the water before you loosen any supply fitting. The Village of Carpentersville, Illinois, explains on its shut-off valve page that "most houses also have fixture shutoff valves at the toilet and at each sink," and that the kitchen sink valves "are inside the cabinets beneath the sink." This is the first place your light needs to reach. If a valve will not close fully, use the main shut-off, which the same page says is normally "near the water meter."
- Set the bucket and towel under the trap before any light goes in.
- Pick the mount point: a steel plate or magnet spot on the side wall, or a clip, strap or hook point level with the trap.
- Tilt the head so the beam lands on the fitting at 45 to 60 degrees, and check for shadows by moving your hand through the work area.
- Choose the mode: low or medium flood. Save the spotlight for looking down a drain.
- Check the drip line. If the light sits under a joint you are about to loosen, move it up or sideways.
- Keep the lens clear. The Oclip 2 manual warns: "Do not obstruct the lens, or else the energy emitted from the light may cause the object to burn." Never leave a lit light face-down on a towel or sponge.
- Add a second light only if a shadow remains, and place it on the opposite side at a similar angle.
This table applies the routine to common under-sink jobs, with the light position and mode that fit each one.
| Sub-task | Where the work is | Light position | Mode |
|---|---|---|---|
| Replacing a P-trap or slip nut | Front center, near the cabinet floor | Side wall, level with the trap, 45° down | Flood, low to medium |
| Closing or replacing shutoff valves | Back wall, low | Clip on a shelf edge or strap on the tailpiece, aimed back | Flood, medium |
| Swapping supply lines | Back wall up to the faucet tail | High on the side wall or under the countertop lip | Flood, medium |
| Finding the disposer reset button | Bottom of the disposer | Magnet or clip low on the side wall, tilted up | Flood, low |
| Checking for a slow drip | Any fitting | Side light that makes water glint; switch between angles | Flood, low |
| Looking down a drain or disposer outlet | Inside the pipe | Handheld or clipped, aimed along the pipe | Spotlight, low |
Safety note: Before you reach anywhere near a garbage disposer, cut its power. InSinkErator's manual says: "Do not put fingers or hands into a waste disposer." It adds that you should "turn the power switch to the off position before attempting to clear a jam, removing an object from the disposer or pressing reset button," and use long-handled tongs or pliers to remove objects.
Do You Need a Waterproof Light Under a Sink?
You need a light that can take drips and splashes, and ideally one that survives a fall into the bucket. IPX4 covers splashing water, IPX6 covers powerful water jets, and only IPX7 or IPX8 covers immersion. A clip light rated IP66 is fine above the drip line. A backup light rated IPX8 is the safer one to keep near standing water.
The second digit of an IP code rates protection against liquids. Enclosure maker DSMT's IP rating chart, which summarizes IEC 60529, describes level 4 as "water splashing against the enclosure from any direction shall have no harmful effect" and level 6 as "water projected in powerful jets (12.5mm nozzle) against the enclosure from any direction shall have no harmful effects." Test lab Keystone Compliance explains that IPX7 and IPX8 immersion testing covers immersion up to one meter and over one meter of water. For a plain-language breakdown, see our guide to IPX8 meaning.
Read the rating against the manual. The Oclip 2 Pro is rated IP66, and the Oclip 2 user manual states: "Do not immerse the product in water or other liquids, as it will damage the product." That makes it a light for above the drip line, not for the bottom of a flooded cabinet. The Baton 4 is rated IPX8 on its product page, which makes it the better choice to set down on a wet cabinet floor.
This table matches under-sink conditions with the minimum rating that fits them.
| Under-sink condition | What happens to the light | Minimum rating to look for |
|---|---|---|
| Light mounted high, dry job | Occasional splash from above | IPX4 |
| Mounted near a joint you are loosening | Drips and a burst when the nut lets go | IPX6 (IP66 also covers dust) |
| Light set on a wet cabinet floor | Standing water, puddles | IPX7 or IPX8 |
| Could fall into a bucket of drain water | Full immersion | IPX8 |
What Should You Do If Your Flashlight Falls Into Water or Grease?
Turn it off, lift it out with a gloved hand, and wipe off the grease and grit before anything else. Check the rating: an IPX8 light should survive a short dunk, while a light rated IPX6 or IP66 was never meant to be submerged. Dry it fully, including the charging port and magnet, before you connect any charger.
Work through these steps.
- Switch the light off and lock it if it has a lockout. The Oclip 2 manual says to lock the light by pressing and holding the side button for more than 2 seconds while it is off.
- Wipe the body with a damp cloth to remove grease and drain sludge. Do not soak a light that is not rated for immersion.
- Clean the magnet and clip. The Oclip 2 manual warns that metal powder stuck to its magnetic clip "may affect its function. Please clean it immediately." Wet cabinets collect rust flakes and metal filings from old fittings.
- Dry the charging port and contacts with a cloth and let the light air-dry fully before charging. The Oclip 2 manual lists its operating and charging range as 0 to 45°C.
- Test every mode. If a light rated below IPX7 was submerged and now behaves oddly, stop using it and contact Olight support rather than charging it again.
Warning: Standing water in a trap you just opened may hold drain cleaner. The National Library of Medicine's MedlinePlus page on drain cleaner poisoning says these products "contain very dangerous chemicals that can be harmful to your health if you swallow them, breathe them in (inhale), or if they come in contact with your skin and eyes." If a chemical cleaner was used, wear gloves and eye protection to retrieve a dropped light, and rinse the gloves before you touch the light's switch or your face. For skin or eye contact, MedlinePlus says to "flush with at least 2 quarts (1.9 liters) for at least 15 minutes," and the Poison Help line is 1-800-222-1222.
A Plumber Flashlight Setup That Frees Both Hands
A good plumber flashlight setup is two lights: a clip or magnet floodlight mounted high inside the cabinet, and a small immersion-rated flashlight for poking into corners and for the moment the first light gets knocked into the bucket. Add an adhesive steel plate if your cabinet has nothing magnetic. A headlamp is optional; it helps most when you are moving between spots.
This table breaks down how long each light's medium mode lasts on a two-hour under-sink job, using Olight's published runtimes. Share of battery used = 120 minutes ÷ medium runtime in minutes.
| Light | Medium mode (Olight spec) | Medium runtime | Share of battery for a 2-hour job | Regular price (September 2026) |
|---|---|---|---|---|
| Olight Oclip 2 Pro | Floodlight 100 lumens | 3 hours 45 minutes (225 min) | 120 ÷ 225 = 53% | $54.99 |
| Olight Oclip Pro S | White light 100 lumens | 3.5 hours (210 min) | 120 ÷ 210 = 57% | $39.99 |
| Olight Perun 3 Mini | Med 100 lumens (CW) | 4.5 hours (270 min) | 120 ÷ 270 = 44% | $64.99 (default version Sold Out, September 2026) |
| Olight Baton 4 | Med 60 lumens | 8 hours (480 min) | 120 ÷ 480 = 25% | $54.99 |
Every light in the table finishes a two-hour job on medium with charge to spare. The mode to avoid for long jobs is high: the Oclip 2 Pro floodlight's High mode is listed as 300~100 lumens for 60+5 minutes, and its Turbo as 530~300~100 lumens for 1+58+5 minutes.
The main light: Olight Oclip 2 Pro. The hard part under a sink is holding an aim from an awkward mount. The Olight Oclip 2 Pro ($54.99, regular price, September 2026) answers with a 115° tilting head, a 360° rotating clip that grips up to 14 mm, and magnets at the tail and on the clip. Its floodlight runs Turbo 530~300~100 lumens, High 300~100 lumens, Medium 100 lumens for 3 hours 45 minutes, Low 10 lumens for 25 hours and Moon 1 lumen for 144 hours. It weighs 75.5 g and is rated IP66 with 2.0 m impact resistance. The limit: it is not for immersion, and its magnets need steel. If you already own clip lights, the Olight Oclip series page lists the other models.
The budget main light: Olight Oclip Pro S. The Olight Oclip Pro S ($39.99, regular price, September 2026) is lighter at 53 g, and Olight says you can "clip, hang, or magnet-mount it." Its white light runs Turbo 600~300~100 lumens, High 300~180~100 lumens, Medium 100 lumens for 3.5 hours, Low 10 lumens for 27 hours and Moon 1 lumen for 144 hours, with 1,600 candela peak and an IPX6 rating. It lacks the Oclip 2 Pro's tilting head, so the mount point decides the aim. It also has a 365 nm UV light; never look into the UV emitter, and avoid shining it on skin or eyes. The Oclip Series Headlamp Strap ($7.99, regular price, September 2026) is listed as "compatible with the Oclip Pro, Oclip Pro S and Oclip Ultra," which turns the Pro S into a headlamp when you need light that follows your eyes. Olight does not list the strap for the Oclip 2.
The dunk-proof backup: Olight Baton 4. The Olight Baton 4 ($54.99, regular price, September 2026) is rated IPX8 and weighs 52.5 g. It runs Turbo 1,300~600~300 lumens (1.5 + 2.5 + 73 minutes), High 600~300~60 lumens (7 + 72 + 16 minutes), Med 60 lumens for 8 hours, Low 12 lumens for 35 hours and Moon 0.5 lumens for 30 days. Its Baton 4 user manual lists a working temperature of 0 to 40°C and a timer that can switch the light off after 3 or 9 minutes. The limit: its TIR optic makes a tighter beam than a floodlight, so use Low or Med up close and bounce it off the cabinet wall if the center is too harsh.
The headlamp option: Olight Perun 3 Mini. The Olight Perun 3 Mini ($64.99, regular price, September 2026) converts from headlamp to handheld and has a magnetic tailcap and IPX8 rating. It runs Turbo 1,250~350 lumens (2 + 60 minutes), High 500~350 lumens (2 + 75 minutes), Med 100 lumens for 4.5 hours, Low 10 lumens for 30 hours and Moon 2 lumens for 10 days. In September 2026, its default Orange CW version showed Sold Out at Olight's US store, so check availability before you plan around it. If it is out of stock, the Oclip Pro S on the Oclip Series Headlamp Strap covers the same head-worn role. Either way, a headlamp alone still suffers from the doorway angle, so pair it with a mounted light.
Note: Magnet lights and pacemakers do not mix well. The Oclip 2 manual says: "If you have an ICD or pacemaker, avoid close or prolonged contact with this product to prevent possible interference." Lying on your back under a sink puts a clipped light close to your chest, so mount it on the cabinet, not on your shirt.
The same flood-first, hands-free logic carries over to electrical work. If you also work in panels and junction boxes, compare the options in our guide to choosing an electrician flashlight.
Is Undercabinet Lighting Worth It?
Undercabinet lighting is worth it for kitchen counters, because ceiling lights behind you put your own shadow on the work surface. Fixtures under the wall cabinets light the counter from the front and above. LED versions cost little to run. A 9-watt, 450-lumen bulb on the DOE's sample label costs $1.08 a year at 3 hours a day.
That cost figure comes from the sample Lighting Facts label in the U.S. Department of Energy's Energy Saver Guide, which lists a 450-lumen, 9-watt bulb at $1.08 per year, "Based on 3 hrs/day, 11¢/kWh." You can check it yourself: 9 W × 3 h × 365 days = 9,855 Wh, or 9.855 kWh, and 9.855 × $0.11 = $1.08. The same guide notes that "kitchen lights are some of the most used in a house."
Inside the sink base cabinet, the answer is different. A permanent light there helps you find the dish soap, but it rarely sits where a repair needs light. The pipes and your body block it just as they block a light from the doorway. For repairs, a portable light you can put next to the fitting still does the job better.
What Is the Best Type of Lighting to Put Over a Kitchen Sink?
The best light over a kitchen sink is a downlight or small pendant centered over the front half of the basin. Light from directly above and slightly in front of you falls on the dishes and faucet instead of behind your head. Pick a color temperature that matches the rest of the kitchen. The DOE describes 2700 to 3000 K as warm light and 3500 to 4100 K as cool light.
The DOE's Energy Saver Guide gives those ranges on its bulb-shopping page: "For warm/soft light, look for bulbs marked 2700–3000 K" and "For cool/bright light, look for bulbs marked 3500–4100 K." It lists 5000 to 6500 K for "blue-white light that mimics daylight." Match the fixture over the sink to the undercabinet lights so the counter does not switch color as you move.
Position matters more than the fixture style. A light mounted high on the ceiling behind you recreates the doorway problem from the cabinet below: your head and shoulders shade the basin. Mount the fixture so its center falls over the front half of the sink, and your body stays out of the beam while you rinse.
What Is the Best Type of Under Counter Lighting?
The best under counter lighting is a slim LED strip or bar mounted toward the front of the wall cabinet's underside. From there it spreads light across the full depth of the counter instead of washing only the backsplash. Choose a dimmable or switched model, and match its color temperature to the ceiling lights.
The geometry from the sink cabinet applies here too. A light at the back of the cabinet hits the backsplash hard and leaves the front of the counter, where you chop and read labels, dimmer. A light toward the front aims down at a steeper angle, which shortens shadows from bottles and appliances, as the shadow table above shows.
Controls are worth the small extra cost. The DOE's Energy Saver Guide notes that "controls such as timers and photocells save electricity by turning lights off when not in use," and it says dimmers save electricity when used to lower light levels. Undercabinet lights are often left on after cooking, so a timer or motion switch pays back quickly.
Your Under Sink Lighting Checklist
Before your next repair, set up under sink lighting in this order: empty the cabinet, close the shut-off valves, place the bucket, mount a floodlight high on the side opposite your working hand, set it to low or medium, and keep an immersion-rated backup within reach. Cut power to the disposer before your hands go near it.
- Empty the cabinet floor and move rags and aerosol cans away from the disposer.
- Close the sink's fixture shut-off valves before you loosen a supply line, and know where the main shut-off is.
- Test your mount point with the magnet first; add an adhesive steel plate if nothing holds.
- Aim the light 45 to 60 degrees down onto the fitting from 8 to 16 inches away.
- Use flood on low or medium; switch to the spotlight only to look down a pipe.
- Keep any light rated below IPX7 above the drip line and out of the bucket.
- Check that your lights are charged: a 2-hour job uses about half of a clip light's medium-mode runtime.
- After the job, wipe the magnet and clip, dry the charging port, then recharge.
FAQ
Changelog
- September 23, 2026: First published.