Olight makes some of the lights discussed here. Olight specs and prices come from its product pages and user manuals as of September 2026; winch, safety and legal facts come from the sources linked in each section.
⚡ TL;DR
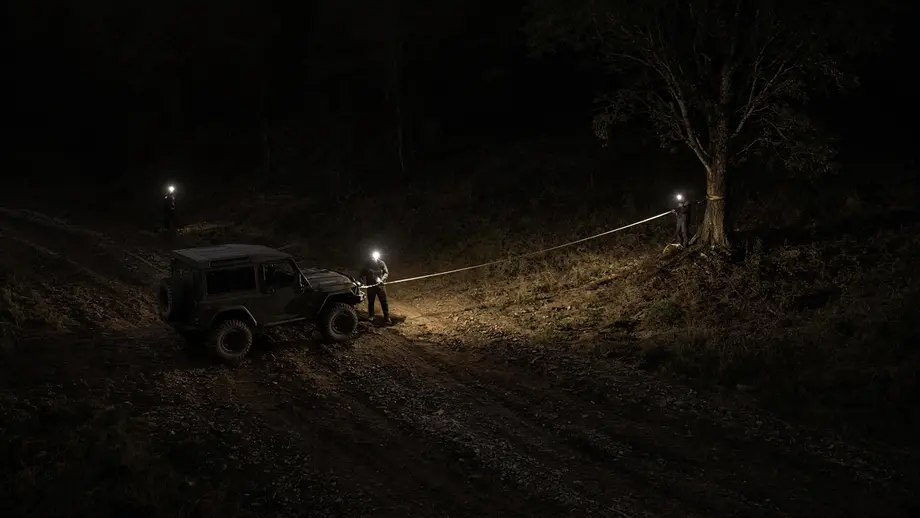
For a night recovery off-road, light the winch rope along its whole length, not the stuck vehicle. Everyone on scene has to see where the line runs, where it is anchored, and what the spotter's hands are saying. Use three portable points, all set outside the danger zone: a side flood on the rope, a throw beam on the anchor, and a dim light at the operator station.
The stuck vehicle is the easy thing to see at night. Its paint shines and its lights are on. The rope is the hard part. A black synthetic line lying across dark mud nearly disappears, yet it is the part that can hurt someone. Add two sets of headlights glaring at each other and a spotter whose hands vanish outside the beam, and even an easy pull turns risky. This guide fixes each of those problems with distances, light levels and a setup you can copy.
This night recovery off-road kit list shows each lighting job, the type of light that handles it, the minimum spec to look for, and an Olight example that meets it.
| Job | Recommended type | Minimum spec | Olight example |
|---|---|---|---|
| Light the full rope from the side | Handheld flood you can prop on a rock or bumper | About 600 lumens of flood for 2+ hours | Marauder Mini 2: 600~150 lm floodlight for 7 + 3 hours |
| Check the anchor from outside the danger zone | Throw flashlight | About 10 lux on a target 34 m away at a sustainable level | Warrior X 4: 300 lm Low for 8 hours (about 10 lux at 34 m, calculated) |
| Operator and spotter, hands-free | Headlamp with a medium white mode and a red mode | About 120 lm for hours; red light; glove-friendly switch | Perun 3: 120 lm for 25 hours; red 60 lm for 14 hours |
| Mark where each person stands | Small red clip light | Red low mode that runs all night | Oclip 2 Pro: red light 4 lm for 27 hours |
| Backup | Any second light per person | Charged before the trip | A spare headlamp or handheld |
📋 Table of Contents
- 1. Quick Answer: Light the Whole Rope, Not the Stuck Vehicle
- 2. Where Is the Winch Danger Zone, and Why Is It Hard to See at Night?
- 3. How Do You Set Up Three-Point Lighting for Winching at Night?
- 4. How Should the Spotter and Winch Operator Signal in the Dark?
- 5. Why Aren't Vehicle Headlights Enough to Light a Winch Line?
- 6. How Do You Keep Lights Working in Mud and Water During a Recovery?
- 7. What 4WD Recovery Light Setup Should You Keep in the Vehicle?
- 8. How Much Is Matt's Off-Road Recovery Worth?
- 9. How Much Is an Off-Road Recovery?
- 10. What Are Some Good Off-Road Recovery Items?
- 11. Night Recovery Off-Road Checklist
- 12. FAQ
Quick Answer: Light the Whole Rope, Not the Stuck Vehicle
A night recovery off-road needs light on three things: the full length of the winch rope, the anchor, and the person running the winch. Aim a flood at the rope from the side, well outside the danger zone. Hit the anchor with a throw beam, and give the operator a headlamp on medium. Everyone should be able to trace the rope from the fairlead to the anchor at a glance.
Portable lights also beat fixed ones here because you can move them. A recovery rarely runs in a straight line down a lit road. The anchor may be a tree 30 degrees off to one side, or a second vehicle parked behind a rise. A handheld or headlamp can go wherever the rope goes. Olight's outdoor flashlights include the flood, throw and headlamp types used in this guide.
Here is the rule to remember: if you cannot see the whole rope from where you stand, you are either standing in the wrong place or the light is. Fix that before anyone presses the winch-in switch.
Where Is the Winch Danger Zone, and Why Is It Hard to See at Night?
The winch danger zone is any spot a rope, hook or anchor strap could reach if something broke. Superwinch's user guide tells users to "Keep all observers a distance from the winching operation equal to the length of rope that is in use." At night, the edge of that zone is hard to judge because nobody can see where the rope actually runs.
Warn Industries, the winch maker, puts the rule bluntly in its Basic Guide to Winching: "Always stand clear of winch rope and load and keep others away while winching." Its winch techniques guide adds that once the rope is attached, "do not step over the line in case the rope were to come under accidental tension." Once the rope is under tension, it says to "stand well clear" and never step over it.
Superwinch's Electric Winch User's Guide (90-14530EN Rev A) explains the risk: "The snap back of a broken wire rope can cause serious injury." It also shows a winch dampener, blanket or heavy jacket laid over the rope "to direct energy to the ground in case of winch rope breakage." Warn says its damper is there "to prevent rope recoil in the rare event of a rope failure," and places it "midway between the winch and the anchor point." Superwinch's guide instead says to "use a rope dampener over the wire rope near the hook end," so put it where your own winch's manual says. Either way, someone has to see the rope well enough to walk the damper out and back.
Darkness breaks those assumptions in three ways:
- The rope blends in. Black or dark synthetic rope over mud, wet rock or shadow reads as one more dark stripe.
- People drift. In the dark, a helper who steps back "to get out of the way" can end up closer to the line than before, because nobody can see the line.
- Distance collapses. Without landmarks, 50 feet and 100 feet look alike, so the keep-out distance becomes a guess.
This table turns the Superwinch rule into distances you can pace off, and shows how far a side light placed at the edge of the zone sits from the rope. It reads the rule conservatively: the keep-out distance runs from any point on the rope, and the light sits level with the rope's midpoint.
| Rope in use | Keep-out distance (Superwinch rule) | Side light to rope midpoint | Side light to fairlead or anchor |
|---|---|---|---|
| 50 ft (15.2 m) | 50 ft (15.2 m) | 15.2 m | √(15.2² + 7.6²) = 17.0 m |
| 75 ft (22.9 m) | 75 ft (22.9 m) | 22.9 m | √(22.9² + 11.4²) = 25.6 m |
| 100 ft (30.5 m) | 100 ft (30.5 m) | 30.5 m | √(30.5² + 15.2²) = 34.1 m |
The rope length is realistic: Warn's ZEON 10-S winch page lists 100 feet of 3/8-inch synthetic rope and a 10,000 lb rated line pull. With the whole rope out, your lights sit 30 to 35 meters from the parts they need to show. That distance decides which lights can do the job, as the next section shows.
Safety note: Pace the keep-out distance before dark if you can, and mark its edge with a red light or a reflective stake. Once the rope is loaded, nobody crosses that line or steps over the rope for any reason. Stop the winch first.
How Do You Set Up Three-Point Lighting for Winching at Night?
Three-point lighting for winching at night puts one light on the rope, one on the anchor, and one on the operator's work. Set a flood beside the rope at the edge of the danger zone so it rakes along the line. Aim a throw beam at the anchor from behind the operator's shoulder. Keep a headlamp on medium for the operator. Nobody stands in a beam's path to the rope.
Each point solves a different problem. The rope light answers "where is the line?" The anchor light answers "is the strap still where I put it?" The operator light answers "is the rope spooling evenly?" Warn's guide asks the operator to "Be sure that the winch rope is winding evenly, and tightly around the spooling drum," which is close work at arm's length, and it asks everyone to check the anchor and make sure "all connections are secure and free of debris."
How much light reaches the rope and anchor from a safe distance?
For a beam, illuminance in lux equals candela divided by distance in meters squared, so the candela an anchor needs grows with the square of its distance. For a benchmark, the OSHA construction standard 29 CFR 1926.56, reproduced by Cornell's Legal Information Institute, sets 3 foot-candles for "field maintenance areas" and 5 for "General construction area lighting." At 10.764 lux per foot-candle, that is about 32 and 54 lux.
This table works backward from an anchor 34.1 m away, which is the full 100 ft rope plus a few meters behind the operator, or the side-light distance in the table above. It shows the candela each target needs (lux × 34.1²), then the lumens each light would have to run to supply it. Olight publishes candela for the maximum mode only, so the lumen columns assume candela scales with lumens in the same beam, and they treat the Marauder Mini 2's 140,000 cd as belonging to its 1,350-lumen top spotlight level. They are based on Olight's rated values, not measured.
| Target on the anchor at 34.1 m | Candela needed | Warrior X 4 lumens needed (99,310 cd at 2,600 lm) | Marauder Mini 2 spotlight lumens needed (140,000 cd at 1,350 lm) | Perun 3 lumens needed (6,400 cd at 3,000 lm) |
|---|---|---|---|---|
| 1 lux: strap outline visible | 1,163 cd | 30 lm | 11 lm | 545 lm |
| 5 lux: strap and shackle position | 5,814 cd | 152 lm | 56 lm | 2,725 lm |
| 10 lux: confirm the strap hasn't moved | 11,628 cd | 304 lm | 112 lm | 5,451 lm (above its 3,000 lm maximum) |
| 32.3 lux: OSHA 3 foot-candle level | 37,559 cd | 983 lm | 362 lm | 17,606 lm (not possible) |
Now read across to the modes Olight lists. The Warrior X 4's Regular Low, 300 lumens for 8 hours, lands almost exactly on the 10-lux line. The Marauder Mini 2's spotlight comes close at Level 1-2 (100 lumens, 30 hours) and clears it at Level 2-1 (200~100 lumens, 12 + 3 hours). About 10 lux is enough to see that a strap is still in place, though not to inspect a shackle pin; do that with a headlamp before the pull.
The Perun 3 can't reach 10 lux at 34 m on any setting. Even its rated 6,400 cd on Turbo gives 6,400 ÷ 34.1² = 5.5 lux, and Turbo holds 3,000 lumens for only 2 minutes. That is why the headlamp belongs at the operator station. And no handheld, run at a level it can hold for hours, lights an entire 30 m rope to the OSHA work benchmark. You don't need it to. The rope has to be visible against the ground, not lit like a job site.
How much flood does the rope itself need?
A rope is long and thin, so light it as a strip. Picture a 1 m wide band along a 30.5 m rope, or 30.5 m². At the OSHA 3 foot-candle level (32.3 lux), that band needs 30.5 × 32.3 = 985 lumens landing on it. A flood aimed from 30 m away spills most of its light, so assume a quarter of the output lands on the band. That share is our assumption, and it depends on the terrain and aim. At 25%, you would need about 3,940 lumens.
The Marauder Mini 2 can reach that, but only for a few minutes: its Level 4-1 floodlight runs 5,000~2,500~550 lumens for 4 + 90 + 80 minutes, so it clears 3,940 lumens for about 4 minutes before stepping down to 2,500. A visibility target is more sustainable. At 5 lux on the band, the rope needs 30.5 × 5 = 153 lumens landing, or about 610 lumens from the light at 25%. That matches the Level 2-2 floodlight, 600~150 lumens for 7 + 3 hours.
Tip: Set the rope light low and to the side so it rakes along the line. Light striking a rope at a shallow angle picks out its texture and its shadow on the ground, which makes a dark rope far easier to see than light from straight overhead.
A worked example: a pickup in a clay wash at 9:30 p.m.
Say a pickup has slid into a clay wash and sits axle-deep. The only good anchor is a juniper about 80 feet ahead and slightly left, and your recovery truck will winch from the bank above. Here is the order of work:
- Park the winch vehicle, set the brake, and turn its headlights to low or off before anyone walks forward. Mark your people with red clip lights so the driver can see where everyone is.
- Walk the rope out with a headlamp on medium. Rig the tree trunk protector low on the trunk, as Warn recommends, while the rope is slack and the remote is unplugged.
- Set the rope flood beside the line, about 80 feet out from it and level with its midpoint, on a rock or a bumper. Aim it so it rakes along the whole rope.
- Prop the throw light on a rock or cooler behind the operator, aimed at the anchor on a low setting, so the beam doesn't shine into anyone's face.
- Lay the damper where your winch's manual puts it (midway for Warn), then walk back out of the zone by the long way around. Nobody steps over the rope.
- The operator takes up the slack. Then everyone confirms the rope is visible end to end before the pull starts.
How Should the Spotter and Winch Operator Signal in the Dark?
The spotter and operator should agree on light signals before the pull and treat any signal they can't read as stop. Warn's winching guide says that "if the driver controlling the winch cannot see both hands of the assistant, the winch should not be activated." At night, hands disappear, so the spotter holds a light and the operator watches for it.
Superwinch's user guide gives the daytime winch signals and asks that "both people agree on and understand the basic winch signals" and "review hand signals before ANY winching begins." For night light signals, the U.S. Army's training circular TC 3-21.60, Visual Signals (March 2017) is a useful public reference. It says: "Flashlights are used at night to direct vehicles. Blue filters should be used whenever possible to preserve the driver's night vision."
This table pairs the Superwinch daytime signals with light versions. The Army signals were written for guiding vehicles, not winches, so treat them as a starting point your team agrees on, not a standard.
| Command | Daytime signal (Superwinch) | Night light version | Source for the night version |
|---|---|---|---|
| Stop | "Arm raised, hand in a fist, motionless" | Move a light horizontally back and forth several times | TC 3-21.60, "halt" or "stop" |
| Winch in | "Upper arm straight out, lower arm pointing UP, index finger moving in circles" | Small circles with a light held high, agreed in advance | Team agreement, no Army equivalent |
| Winch out | "Upper arm straight out, lower arm pointing DOWN, index finger moving in circles" | Small circles with a light held low, agreed in advance | Team agreement, no Army equivalent |
| Start engine | Not covered | "move a light to describe a horizontal figure 8 in a vertical plane in front of body" | TC 3-21.60 |
| Move in reverse | Not covered | "hold a light a shoulder level; blink it several times toward the vehicle(s)" | TC 3-21.60 |
| Signal lost | Operator can't see both hands | Operator can't see the spotter's light: stop | Warn's both-hands rule applied at night |
Two details make light signals work. First, the spotter's light should point at the ground or at the spotter's own hand, not at the operator's eyes. The Army's "halt" signal moves the light across the path of approaching traffic, and it doesn't need to shine into anyone's face. Second, colors should mean the same thing to everyone. TC 3-21.60 lists red as "DANGER" for flag signals and notes that "flashlights with colored filters or colored chemical lights may be substituted for flags." A red clip light on each person reads as "a person is here" without blinding the operator.
What glare does to a signal
A bright light in the face costs seconds, and those seconds matter while a rope moves. A Safety Science study by Lockhart and colleagues, archived at the National Library of Medicine, notes: "Glare recovery time for 65-year-olds has been reported to be 9 s in comparison to 2 s for 25-year-olds."
Put that next to a winch's speed. Warn's ZEON 10-S page lists the ZEON line's no-load line speed at 33 ft/min, or 33 ÷ 60 = 0.55 ft per second. That is an upper bound, because a loaded winch pulls more slowly. If a headlight dazzles the operator just as the spotter signals stop, the rope can travel 0.55 × 2 = 1.1 ft in 2 seconds, and 0.55 × 9 = 5.0 ft in 9 seconds, before the operator's eyes recover enough to read the signal. Five feet can put a vehicle onto a rock or a spotter who has drifted too close.
Warning: Never use a strobe during a recovery. The Warrior X 4 and Marauder Mini 2 both have strobe modes, and Olight's Marauder Mini 2 manual says "Do not stare at operating light source." A flashing beam hides hand signals, blinds the operator, and could be mistaken for the stop signal.
Why Aren't Vehicle Headlights Enough to Light a Winch Line?
Vehicle headlights are aimed along the vehicle's axis, so they light the ground ahead of the bumper, not a rope that runs off at an angle or an anchor behind a rise. In a vehicle-to-vehicle pull, the two sets of headlights face each other and glare into both drivers' eyes. They also draw on a battery the winch already depends on.
The angle problem gets worse with rigging. Warn explains that "A snatch block, secured to a point directly in front of the vehicle, will enable you to change your pulling direction." Once the rope redirects through a block, half of it runs where the headlights never point. Your portable lights have to follow that angle.
The glare problem is built into how headlamps are designed. Arizona's statute on multiple-beam headlamps, ARS 28-941, requires that on the lower beam "none of the high intensity portion of the beam shall be directed to strike the eyes of an approaching driver." The same statute's upper-beam requirement has no such limit; that beam only has to "reveal persons and vehicles at a distance of at least three hundred fifty feet ahead." A winch operator facing it from 30 m is standing well inside that reach.
The power problem comes straight from the winch maker. Warn warns: "if the engine is idling during winching, the battery may drain faster than it is charging. Pay close attention to your voltage gauge." Light bars and high beams add to that load. Battery-powered handhelds and headlamps take lighting off the vehicle's electrical system.
Headlights still have a job. Low beams on the winch vehicle light the ground around its bumper, and hazard flashers warn anyone driving past. The fix is to use them for general light and leave the rope, the anchor and the signals to portable lights you can aim.
What do state vehicle codes say about aiming lights near a road?
Recoveries often happen on a forest road shoulder or a county road ditch, where passing drivers meet your lights. State vehicle codes regulate vehicle-mounted lamps, not handheld flashlights, but they show the aiming standard drivers expect. This table quotes the statutes directly. Check your own state's current code before relying on any of them.
| State and section | What the statute says (quoted) | What it means during a roadside recovery |
|---|---|---|
| California Vehicle Code 24411 | Off-highway lamps, "whenever the vehicle is operated or driven upon a highway, shall be covered or hooded with an opaque hood or cover, and turned off" | Cover and switch off off-road light bars before you drive on the highway to or from the recovery |
| California Vehicle Code 24404 | "No spotlamp when in use shall be directed so as to illuminate any other moving vehicle." | Keep any mounted spotlamp off passing traffic |
| California Vehicle Code 24409 | Within 500 feet of an oncoming vehicle, the driver must use a beam "so aimed that the glaring rays are not projected into the eyes of the oncoming driver" | Dip to low beam as traffic approaches the scene |
| Washington RCW 46.37.180 | A spot lamp must be "so aimed and used that no part of the high intensity portion of the beam will strike the windshield, or any windows, mirror, or occupant of another vehicle in use" | Aim spot lamps at the rope and anchor, away from the road |
| Washington RCW 46.37.230 | Within five hundred feet of an oncoming vehicle, glaring rays must not be "projected into the eyes of the oncoming driver" | Same 500-foot dimming rule as California |
| Arizona ARS 28-942 | Dims for oncoming vehicles "within five hundred feet" and when following "within two hundred feet to the rear" | The following distance is 200 feet here, not California's 300 |
The same kind of state-by-state detail governs bicycles; our guide to bike light laws shows how much the rules can differ between states. The common thread for a recovery is simple: light the work, not the road, and never aim a beam at an oncoming driver.
How Do You Keep Lights Working in Mud and Water During a Recovery?
Keep lights off the ground, out of the rope's path, and matched to the conditions by their IP rating. Set them on rocks, bumpers or steel panels rather than in mud. Choose IP68 or IPX8 lights where they may get dunked, and a dust-rated light for sand. After the recovery, rinse off grit, dry the charging port, and clear the magnets.
Mud covers lenses, packs into switches and ports, and carries iron grit onto magnets. Olight's user manual for the Oclip 2 series says "When the charging port is not in use, keep the dust cover closed to prevent dust or foreign objects from entering."
Water ratings tell you about immersion and jets, and the dust digit matters too. An X in the first position means the light was not rated for dust, not that it is dust-proof. Our explainer on IPX8 meaning covers what each digit does and doesn't promise. This table lists the ratings Olight publishes for the lights in this guide.
| Light | Olight rating | Dust | Water | What that means in a recovery |
|---|---|---|---|---|
| Perun 3 | IP68 | Rated (6) | Immersion (8) | Handles a drop in a puddle and blowing sand |
| Marauder Mini 2 | IPX8 | Not rated (X) | Immersion (8) | Survives a dunk; keep it out of blowing dust and clean grit from the rotary controls |
| Warrior X 4 | IPX8 | Not rated (X) | Immersion (8) | Same as the Marauder Mini 2 |
| Oclip 2 Pro | IP66 | Rated (6) | Powerful jets (6) | Good against rain and spray, but not for immersion |
The Oclip 2 Pro's IP66 needs one warning. The Oclip 2 user manual says "Do not immerse the product in water or other liquids, as it will damage the product." Clip it high on a jacket or a roof rack, not low on a bumper that might sink into a water crossing.
Magnets need steel. The Perun 3's magnetic tail lets you "attach it to any iron surface," in Olight's words, and the Oclip 2 Pro has tail and clip magnets. Aluminum bumpers, fiberglass and plastic trim won't hold them. The Oclip 2 manual also notes that the clip is magnetic and tells you to clean off any metal powder that sticks to it right away, which matters after a muddy pull. Our engine bay light guide shows how to test a mounting spot with a fridge magnet first. Never set a magnet on the winch, the fairlead or the rope's path, where a light that slips could fall into moving rope.
Cold matters too. Olight lists a working temperature of 0~40 ℃ for the Marauder Mini 2, and the Perun 3 manual gives 0-40°C, so a recovery below freezing is outside those ratings. The Oclip 2 manual says that below 0°C (32°F) its white light is limited to Low and Medium, and that it can't be charged below 0°C or above 45°C. Keep lights inside your jacket between uses.
Use this cleanup routine after every muddy recovery:
- Switch each light off and let it cool before you clean it.
- Rinse caked mud off rated lights with clean water, then wipe the lens with a soft cloth. Don't scrape grit across the lens.
- Open and dry the charging ports and contacts before you charge anything.
- Pick iron grit off magnets with tape or a cloth before it scratches the body.
Note: Olight's Light Stand ($27.99 regular price, September 2026) uses a 1/4-inch thread and adjusts to 200 or 312 mm tall, and its listed compatible products are lanterns and area lights such as the Swivel Pro, not the handheld lights in this guide. None of the lights recommended here is listed for it, so plan on rocks, bumpers and roof racks as your stands.
What 4WD Recovery Light Setup Should You Keep in the Vehicle?
Keep a four-part 4WD recovery light setup in the vehicle: a big flood-and-spot handheld for the rope, a throw flashlight for the anchor, a headlamp for each person working the winch, and a red clip light for each person on scene. That covers the three lighting points plus the people markers, with enough runtime for a two-hour recovery on sustained modes.
Store that kit where it stays cool. The Oclip 2 manual says "Do not place, charge, or use this light in a car or other environment where the temperature may exceed 60°C." In desert summer, keep the lights in a shaded bin, never on the dash, and charge them out of the sun.
This scene table shows how the requirements change between common recovery conditions.
| Recovery scene | Light on the rope and anchor | Runtime to plan | Water and dirt | Setup note |
|---|---|---|---|---|
| Mud bog winch-out | About 600 lm flood on the rope; low throw on the anchor | 2 to 3 hours | Splash and immersion; IP68 or IPX8 | Lights on rocks or bumpers, never in the rut |
| Sand or dunes | Throw to find a vehicle anchor; flood on the rope | 1 to 2 hours | Blowing sand; favor dust-rated IP6X lights | Anchors are often a second vehicle, so glare control matters most |
| Snow and ice | Flood on the rope; headlamp for rigging | 2+ hours; expect less in the cold | Snow melt | Below 0°C, the Marauder Mini 2 and Perun 3 are outside their rated 0 to 40°C, and the Oclip 2 drops to Low and Medium white |
| Roadside ditch | Flood on the rope, aimed away from traffic | 1 hour | Spray from passing vehicles | Red markers on people; follow the state aiming rules above |
| Rocky ledge or step | Throw on the anchor and the far side of the obstacle | 1 hour | Dust | Spotter stands to the side, lit by a flood, with a light for signals |
The rope light: Olight Marauder Mini 2
The rope light has to stay bright for hours from 30 m away, and it has to switch between a wide flood and a tight spot. The Olight Marauder Mini 2 does both, with up to 10,000 lumens of floodlight and a 140,000-candela spotlight rated to 750 m. For the rope, run Level 2-2 floodlight at 600~150 lumens (7 + 3 hours). For a quick look at a distant anchor, switch to the spotlight. Its manual says that when the light is off and left alone for 10 seconds, "the lockout mode will be activated automatically," which keeps it from switching on inside a bag.
Its limits are real. It weighs 465 g, and Olight lists no mounting magnet, clip or stand thread (its magnetic area is for charging), so you will prop it on something. The manual lists CRI 70 for both white beams, which is fine for seeing a rope but mutes colors such as a faded red strap. Its working range is 0 to 40°C. At $219.99 (regular price, September 2026), it is also the most expensive light in this kit.
The anchor light: Olight Warrior X 4
An anchor check needs a narrow beam that reaches 30 m or more without anyone walking into the danger zone. The Olight Warrior X 4 is rated at 2,600 lumens, 99,310 candela and 630 m. Its Regular Low mode, 300 lumens for 8 hours, is almost exactly the 304 lumens the table above says a 10-lux check on an anchor 34 m away needs. Its High mode steps down 2,600~1,000~300 lumens over 3 + 140 + 20 minutes.
The limit: it is a tactical light with a tail switch and a 13 Hz strobe at 2,600 lumens, and it has no red mode. Keep it in its regular mode and never use the strobe near a winch. At $129.99 (regular price, September 2026), it is the throw light. Our guide to flashlight throw vs flood explains why candela, not lumens, sets its reach.
The operator's headlamp: Olight Perun 3
The operator needs both hands for the remote and the rope, and needs light wherever they look. The Olight Perun 3 headlamp runs 120 lumens for 25 hours on Med, enough for 25 ÷ 2 = 12 full two-hour recoveries on one charge. It has red light at 60 lumens (14 hours) and 15 lumens (70 hours), a large glove-friendly side button, IP68, and a magnetic tail. Its full range is Turbo 3,000~800~600 lumens (2 + 180 + 30 minutes), High 600~120 lumens (300 + 30 minutes), Low 30 lumens (89 hours) and Moon 5 lumens (20 days).
Its limits: even on Turbo it puts only about 5.5 lux on an anchor 34 m away, for 2 minutes, so it isn't an anchor light, and on Turbo it will dazzle anyone the operator turns to face. Keep it on Med or red while people are nearby. Olight notes the headlamp bracket is metal and "is expected to scratch the body of the torch if taken in / out repeatedly." Price: $89.99 (regular price, September 2026).
The people markers: Olight Oclip 2 Pro
The operator needs to know where every person stands, especially anyone who wanders. A red clip light on each jacket does that without glare. The Olight Oclip 2 Pro clips to straps up to 14 mm thick and runs its red light at 4 lumens for 27 hours or 40 lumens for 4 hours. It also has a floodlight (Turbo 530~300~100 lumens, 1 + 58 + 5 minutes; Medium 100 lumens, 3 hours 45 minutes) and a spotlight rated at 3,906 candela and 125 m, so it doubles as a personal work light. It is IP66, not immersion-rated, and costs $54.99 (regular price, September 2026). The Oclip 2 user manual adds a caution for anyone with an implanted heart device: "If you have an ICD or pacemaker, avoid close or prolonged contact with this product to prevent possible interference."
This table lists every published mode tier for the white and red light used in the kit, so you can plan runtime at the level you will actually use.
| Light | Modes used in this kit (Olight rated output and runtime) | Max candela and beam distance | Rating | Weight | Regular price, Sept 2026 |
|---|---|---|---|---|---|
| Marauder Mini 2 | Floodlight: Level 1-2 150 lm (27 h); Level 2-1 300~150 lm (13 + 3 h); Level 2-2 600~150 lm (7 + 3 h); Level 3-1 1,200~600~150 lm (3 + 1 + 3 h); Level 3-2 2,500~1,200~600 lm (30 + 60 + 80 min); Level 4-1 5,000~2,500~550 lm (4 + 90 + 80 min). Spotlight: Level 1-2 100 lm (30 h); Level 2-1 200~100 lm (12 + 3 h); Level 2-2 400~100 lm (6 + 4 h). Red: Level 2 25 lm (84 h) | 140,000 cd; 750 m | IPX8 | 465 g | $219.99 |
| Warrior X 4 | Regular High 2,600~1,000~300 lm (3 + 140 + 20 min); Regular Low 300 lm (8 h); Tactical Med 1,000~300 lm (150 + 20 min) | 99,310 cd; 630 m | IPX8 | 249 g | $129.99 |
| Perun 3 | Turbo 3,000~800~600 lm (2 + 180 + 30 min); High 600~120 lm (300 + 30 min); Med 120 lm (25 h); Low 30 lm (89 h); Moon 5 lm (20 days); Red 60 lm (14 h) and 15 lm (70 h) | 6,400 cd; 160 m | IP68 | 150 g | $89.99 |
| Oclip 2 Pro | Red: High 40 lm (4 h); Low 4 lm (27 h). Floodlight: Medium 100 lm (3 h 45 min); Low 10 lm (25 h) | 3,906 cd; 125 m | IP66 | 75.5 g | $54.99 |
How long will the kit last on one charge?
This runtime budget assumes a two-hour recovery with every light on for the whole time. That is a worst case, since most lights will be on less.
| Light and mode | Rated runtime at that level | Share used in 2 hours (calculated from Olight's ratings) |
|---|---|---|
| Marauder Mini 2, Level 2-2 floodlight 600 lm | 7 hours at 600 lm before stepping to 150 lm | 2 ÷ 7 = 29% of the 600-lumen stage |
| Warrior X 4, Regular Low 300 lm | 8 hours | 2 ÷ 8 = 25% |
| Perun 3, Med 120 lm | 25 hours | 2 ÷ 25 = 8% |
| Perun 3, Red High 60 lm | 14 hours | 2 ÷ 14 = 14% |
| Oclip 2 Pro, Red Low 4 lm | 27 hours | 2 ÷ 27 = 7% |
Every light finishes a two-hour pull with most of its charge left, so a second recovery on the same night is realistic. Olight's Marauder Mini 2 manual notes that its runtimes come from tests "performed indoors under a room temperature of 25 degrees celsius with windless conditions" and "may vary depending on the external temperature and ventilation conditions." Plan for less in the cold. If you are choosing one light for a whole trip rather than a recovery kit, our roundup of the best flashlight for overlanding compares all-round options.
How Much Is Matt's Off-Road Recovery Worth?
Matt's Off-Road Recovery has not published a verified net worth or revenue figure, so any dollar amount you see online is an estimate. What is on the record comes from local reporting: in May 2022, St. George News reported that the Hurricane, Utah, business had over 1.1 million YouTube subscribers, more than 13 full-time employees, and a $100,000 charity drive.
The St. George News report names "Matt Wetzel, owner and founder of Matt's Off-Road Recovery." It says the idea grew out of his towing company: "It was while promoting his towing company, Winder Towing, on Facebook that Wetzel said he began to notice that photos of his off-road recovery ventures had a much higher engagement than anything he posted of tow-truck-related events."
The same article reports that the business had "gone from just a few employees to over 13 full-time employees," and that merchandise sales and fan donations put "a total of $100,000 in donations" toward an all-abilities park in Hurricane. Those are the documented figures. Net worth sites build their numbers from view counts and assumed ad rates, not from financial filings, so treat them as guesses.
How Much Is an Off-Road Recovery?
An off-road recovery by a commercial tow operator often costs more than $1,500 in remote backcountry. The National Park Service warns that towing costs from Canyonlands' four-wheel-drive roads "usually exceed $1,500," and Death Valley notes that "AAA often doesn't cover tows on dirt roads." Remoteness, terrain, time and equipment drive the price.
The National Park Service warns about recovery costs on several of its backcountry pages. This table quotes three of them.
| Location | What the park says (quoted) | Source |
|---|---|---|
| Canyonlands, The Needles | "There is a high risk of vehicle damage, and towing costs usually exceed $1,500." | NPS, Four-Wheel-Drive Roads in The Needles |
| Canyonlands, The Maze | "Visitors caught in the backcountry with disabled vehicles can expect towing fees in excess of $1,500." | NPS, Four-Wheel-Drive Roads in the Maze |
| Death Valley | "Towing charges are high and AAA often doesn't cover tows on dirt roads." | NPS, Backcountry Roads |
These are floors, not quotes. A night call-out, a long drive to the site, winching up a steep grade, or a second truck to anchor all add to the bill. Before you call a service, give them the exact location, the vehicle's weight, how it is stuck, and whether anyone is hurt, and ask for the price before they roll.
The cheapest recovery is the one your own group can do safely. Death Valley's advice applies anywhere remote: "Travel in a group of two or more 4WD vehicles in remote areas and on rough roads." A second vehicle gives you an anchor, a winch and a ride out. If your group can't rig a safe pull in the dark, waiting for daylight or a professional is cheaper than an injury.
What Are Some Good Off-Road Recovery Items?
Good off-road recovery items fall into four groups: rigging, protection, digging and tire gear, and light. Rigging means a winch with a rope damper, tree trunk protector, shackles and a snatch block. Protection means heavy leather gloves and eye protection. Dig-out gear includes a shovel, traction boards and an air compressor. For night work, add a headlamp, a throw light and a flood.
Warn's guides name most of the rigging and protection items, and the Park Service's backcountry advice covers the rest. This table sorts them by job and notes why each matters at night.
| Item | What it does | Source | Why it matters at night |
|---|---|---|---|
| Winch rope damper or blanket | Directs energy to the ground if the rope breaks | Warn; Superwinch | Needs light to place it where the winch manual says and to check it stays put |
| Tree trunk protector | Anchors the rope and protects living trees | Warn | Rig it low on the trunk; the throw light checks it from a distance |
| Shackle | Connects strap ends and the hook loop | Warn | Check the pin with a headlamp before the pull, never during |
| Snatch block | Changes pull direction and adds pulling power | Warn | Moves the rope out of the headlight beams, so portable lights must follow |
| Heavy leather gloves | "Always wear heavy leather gloves when handling winch rope." | Warn | Pick a headlamp you can switch with gloves on |
| Eye protection | "Always remove jewelry and wear eye protection." | Warn | Clear lenses at night, not sunglasses |
| Shovel and basic tools | Digging out and trail repairs | NPS, Death Valley | Flood light on the dig area keeps hands and blades visible |
| Spare tire, plug kit and 12-volt compressor | Fixing flats on rough roads | NPS, Death Valley | Headlamp on medium for tire work |
| Headlamp per person | Rigging and operator light | This guide | Red mode keeps night vision and marks people |
| Throw flashlight | Anchor checks from outside the danger zone | This guide | About 10 lux at 34 m on a low mode |
| Flood-capable handheld | Lights the rope from the side | This guide | About 600 lumens for hours |
Warn also stresses practice: "Operating your winch properly is so important you should practice these techniques before having to face the distractions and stresses of a real winching situation." Do one practice pull at dusk with your lights before you ever need them in the dark.
Night Recovery Off-Road Checklist
Use this night recovery off-road checklist before the first pull. It covers lights, the danger zone, signals and cleanup in the order you will meet them. Keep a copy in the glove box and agree on who stands where before anyone is tired, cold or in a hurry.
- Charge every light before the trip, and carry a second light for each person.
- Stop, assess and decide whether a night recovery is safe at all. Waiting for daylight is a valid choice.
- Turn the winch vehicle's high beams and light bars off before anyone walks forward.
- Put a red clip light on every person so the operator can see where they are.
- Pace out the keep-out distance, equal to the rope in use, and mark its edge.
- Rig with the rope slack and the remote unplugged; nobody steps over the rope.
- Set the rope flood low and to the side at the edge of the zone, aimed along the line.
- Aim the throw light at the anchor from behind the operator, on a low mode.
- Lay the damper where your winch's manual says (Warn: midway), then walk out of the zone the long way around.
- Agree on light signals out loud: stop, winch in, winch out, and "signal lost means stop."
- Pull slowly; check that the rope is spooling evenly under the operator's headlamp.
- Stop the winch before anyone approaches the rope, the anchor or the vehicle.
- After the pull, clean mud off every light, dry the ports, and recharge before you drive on.
FAQ
Changelog
- September 24, 2026: First published.